Load Testing with Gatling - The Complete Guide
This post is a complete, detailed and exhaustive tutorial guide to proficiently using Gatling for load testing. Also check out my Gatling Video Tutorials on YouTube, where I explain these concepts in further detail.
Overview of this Gatling Load Testing Tutorial
Need to do some load testing of your HTTP application server? Gatling is a great tool for the job! This blog post on Gatling load testing will be a heavily involved and in-depth tutorial. By the end of this tutorial, you will have a solid grasp of using Gatling for your next load testing project.
No idea what Gatling is? Check out my Gatling Introduction post first. But to summarise:
- Gatling is an open-source load testing tool written purely in Scala code.
- The straightforward and expressive DSL that Gatling offers makes it simple to write load testing scripts.
- It doesn’t contain a GUI (like say JMeter), although it does ship with a GUI to assist with recording scripts.
- It can run a huge amount of traffic on a single computer, eliminating the need for complex distributed testing infrastructure.
- The Gatling code check be checked into a version control system, and easily used with Continuous Integration tools to run load and performance tests as part of your CI build.
What is Performance Testing?
Before we begin, let’s give a lighting-quick explanation of performance testing.
Performance testing is testing that you execute when you want to see how your system handles varying levels of throughput and traffic.
An application will often work fine when there are only handful of users active. When the number of users suddenly rises, performance problems occur. Performance testing aims to reveal (and ultimately resolve) those potential problems.
There are a few different types of performance testing, such as:
- Load Testing - Testing a system with a predefined volume of users and traffic (throughput)
- Stress Testing - Putting a system under an ever increasing amount of load, to find the “breakpoint”
- Soak Testing - Putting a steady rate of traffic through a system for a longer period, to identify bottlenecks
Gatling is proficient in all these types of performance testing.
Some of the metrics that you can expect to gain from performance testing are:
- Transaction Response Times - how long the server takes to respond to a request
- Throughput - the number of transactions that can be handled over a period
- Errors - error messages that begin to appear at certain points of the load test (such as timeouts)
Table of Contents
This is an exhaustive tutorial post on Gatling load testing, divided into several sections.
If you are new to Gatling load testing, I would recommend following through each of the sections in order. Or if you already have some experience with Gatling, I have designed the content so that you can jump to any section and find the information you are looking for.
- Installation of Gatling from Website Download
- The Application Under Test - The Video Game DB
-
Gatling Feeders - for Test Data
- 6.1 CSV Feeders
- 6.2 Custom Feeders
- Gatling Results Analysis
- Summary & Next Steps
Source Code
You can find all the source code from this blog post on my Github Repo.
1. Installation of Gatling from Website Download
Before you do anything, make sure that you have the JDK8 (or newer installed). If you need help with this, check out this guide on Installing the JDK.
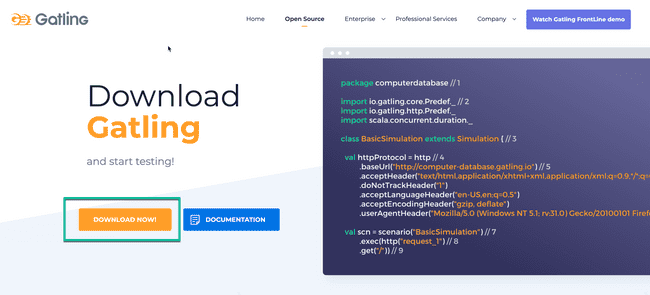
The simplest way to install Gatling is to download the open-source Gatling version from the Gatling.io website. Click Download Now, and a ZIP file will be downloaded:
Unzip the file anywhere on your computer. Open up the new folder, and browse to the bin directory. From here, run either:
- gatling.bat - If you are on Windows
- gatling.sh - If you are on a Mac or Unix machine
Gatling will load, and you will be asked to choose a simulation to run:
Press 0 to choose the computerdatabase.BasicSimulation. You will be asked to enter a run description, but this is optional and can be left blank.
Gatling will go ahead and run the script that you choose - which executes a basic load test against the Gatling computer database training site.
2. Gatling Recorder
Running the scripts that ship with Gatling is fine, but doubtless you will want to develop scripts against your own application.
Once you become proficient with Gatling (by the end of this post!) you should be able to write scripts from scratch in your IDE or even text editor.
But before doing any of that, it can be handy to use the built in Gatling Recorder to record your user journey.
2.1 Generate HAR File
The best way I have found to use the Gatling Recorder, is to first generate HAR (Http Archive) file of your user journey in Google chrome.
Generating these files, and importing them into the Gatling Recorder, allows you to overcome issues with HTTPS recordings.
Follow these steps to produce a HAR file:
- Open the Gatling computer database training site - this is the site we will record a user journey against.
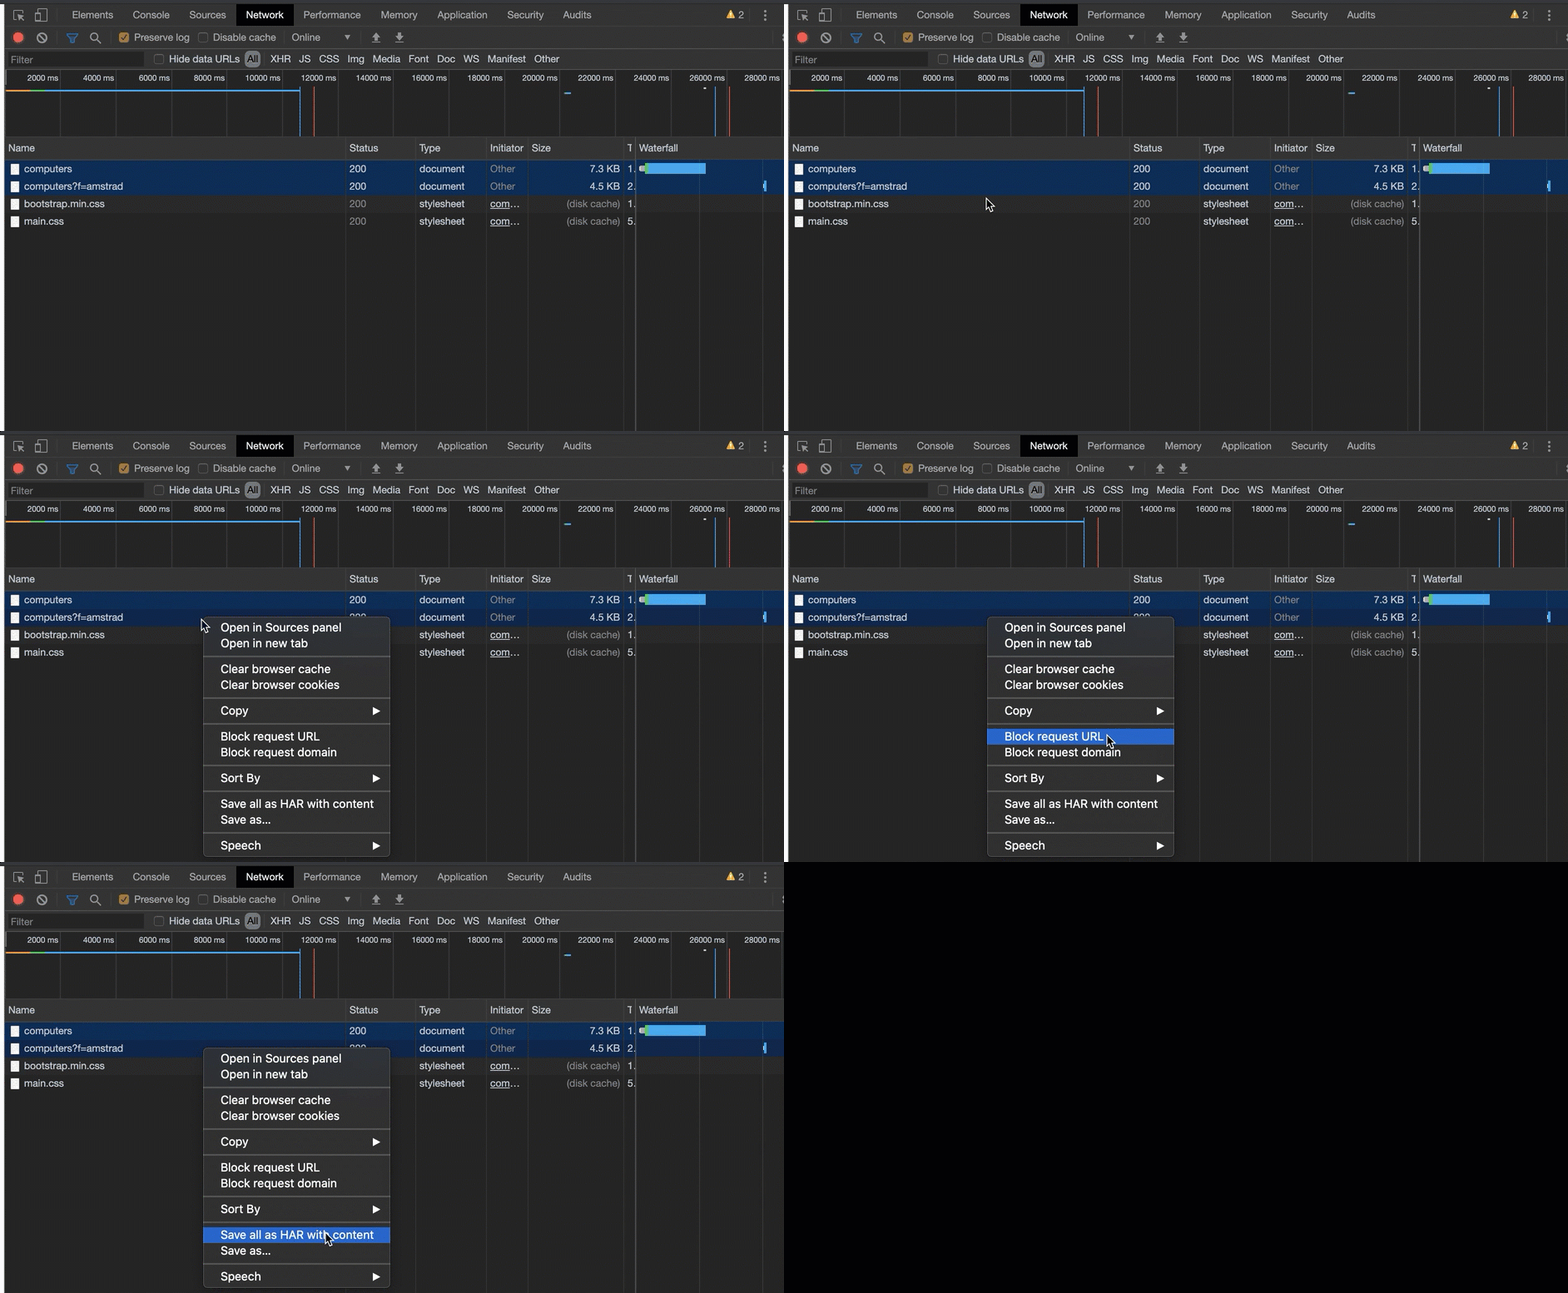
- Open Chrome Developer Tools, and click on the Network tab.
- Click the Clear button to remove any previous network calls, and ensure that the red recording button is enabled.
- Browse through the website to complete your user journey - for example, search for a computer, create a computer etc. You should see entries begin to populate inside the Network tab.
- Right-click anywhere inside the Network, and choose
Save all as HAR with content. Save the file somewhere on your machine.
- Now, browse to your Gatling Bin Folder (where you first ran Gatling in the previous section) and run either
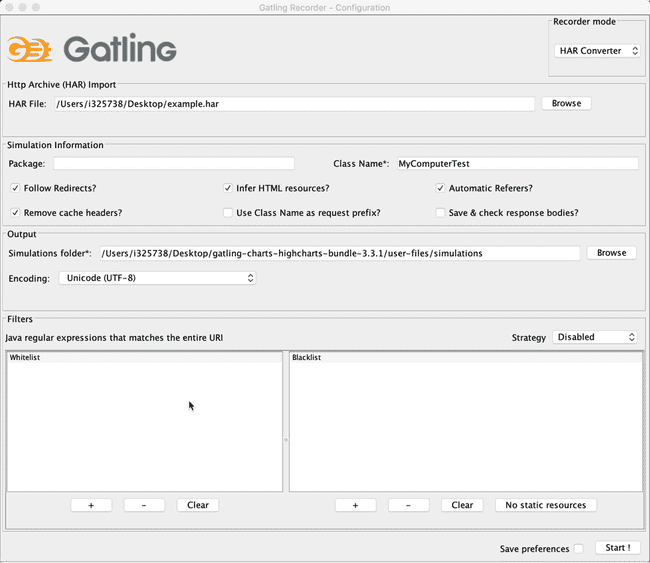
recorder.shon Mac/Unix orrecorder.baton Windows. The Gatling Recorder will load. - Change the Recorder Mode in the top right to
HAR Converter. - Under the HAR File section, browse to the location of the HAR file you generated in step 5.
- Give your script a name by changing Class Name to
MyComputerTest - Leave everything else as default and click
Start ! - If you everything goes OK, you should get a success message.
- To run your script, return to the Gatling Bin folder and run the
gatling.shorgatling.batfile again. Once Gatling loads, you can select the script that you just created.
If you want to take a look at the script you just created, you can find it in the user-files/simulations folder of your Gatling directory. Open up the MyComputerTest script you just recorded in a text editor. It should look something like this:
import scala.concurrent.duration._

import io.gatling.core.Predef._
import io.gatling.http.Predef._
import io.gatling.jdbc.Predef._

class MyComputerTest extends Simulation {

	val httpProtocol = http
		.baseUrl("http://computer-database.gatling.io")
		.inferHtmlResources()
		.userAgentHeader("Mozilla/5.0 (Macintosh; Intel Mac OS X 10_15_2) AppleWebKit/537.36 (KHTML, like Gecko) Chrome/79.0.3945.130 Safari/537.36")

	val headers_0 = Map(
		"Accept" -> "text/html,application/xhtml+xml,application/xml;q=0.9,image/webp,image/apng,*/*;q=0.8,application/signed-exchange;v=b3;q=0.9",
		"Accept-Encoding" -> "gzip, deflate",
		"Accept-Language" -> "en-GB,en-US;q=0.9,en;q=0.8",
		"Upgrade-Insecure-Requests" -> "1")


	val scn = scenario("MyComputerTest")
		.exec(http("request_0")
			.get("/computers")
			.headers(headers_0))
		.pause(9)
		.exec(http("request_1")
			.get("/computers?f=amstrad")
			.headers(headers_0))
		.pause(4)
		.exec(http("request_2")
			.get("/assets/stylesheets/bootstrap.min.css")
			.resources(http("request_3")
			.get("/assets/stylesheets/main.css")))

	setUp(scn.inject(atOnceUsers(1))).protocols(httpProtocol)
}
This is your Gatling script. Don’t worry if all this code looks alien to you, we will cover everything you need to know in the rest of the post.
3. Gatling Project Setup
So now you have had a taste of what a Gatling script looks like (and how to run a load test with it), let’s move on and start setting up a proper development environment for the creation of our scripts. The first thing that we need to choose is an IDE:
3.1 Choose an IDE for Gatling Load Test Script Development
Although it is totally possible to develop Gatling scripts in any text editor, it’s much easier (and more efficient) to do it in an IDE. At the end of the day, we are writing Scala code here. Scala sits on top of the JVM, so any IDE that supports the JVM should be good.
You have a few options here:
- You could use Eclipse, which is a widely used Java IDE. I haven’t used Eclipse much recently, so check out this How to Set up and Run Your Gatling Tests with Eclipse article if that’s the route you want to go.
- Another option that has (recently) become available is Visual Studio Code, or VS Code for short. This IDE has grown at a breakneck speed over the past few years, and has become popular with developers of many different tech stacks. Check out my blog post on developing gatling with scripts with VS Code for pointers on getting setup.
- My preferred option, and the one I’ll be following in this blog post, is IntelliJ IDEA. The community edition is fine, and comes with built-in Scala support. Perfect for developing Gatling scripts.
Now that we have chosen our IDE, we will want a build tool to go with that:
3.2 Choose your Build Tool for Gatling
Now of course, you could use Gatling without a build tool and just run it from the raw zip files (as we did in the first section). But chances are, before long you will want to use a build tool with your Gatling load testing project. This will facilitate easy maintenance in a version control system. Again, you have a few options to choose from here:
- You could use Gradle, which is an extremely popular build tool. Strangely the Gatling project doesn’t provide an official plugin for Gradle, so the one that I recommend is the Gradle Gatling Plugin by lkishalmi. Check out my blog post on Running Gatling through Gradle if you need help getting that setup.
- Another good option is the Scala Build Tool, or SBT for short. Gatling does provide an official SBT plugin. Be sure to check out the Gatling SBT Plugin Demo project as well, to see how its setup.
- The third choice, which is again my preferred and the one i’ll be using in this post, is Maven. If you have worked with Java for any length of time, likely you will have used Maven at some point. There is an official Gatling Maven plugin, and a Gatling Maven Plugin Demo project that you can check.
I’ll walkthrough setting up a brand new project in IntelliJ Idea with a Maven archetype in the rest of this section.
3.3 Create Gatling Project with Maven Archetype
Open a terminal or command prompt and type:
mvn archetype:generateEventually, you will see this prompt:
Choose a number or apply filter (format: [groupId:]artifactId, case sensitive contains):Go ahead and type in gatling.
You should then see:
Choose archetype:
1: remote -> io.gatling.highcharts:gatling-highcharts-maven-archetype (gatling-highcharts-maven-archetype)
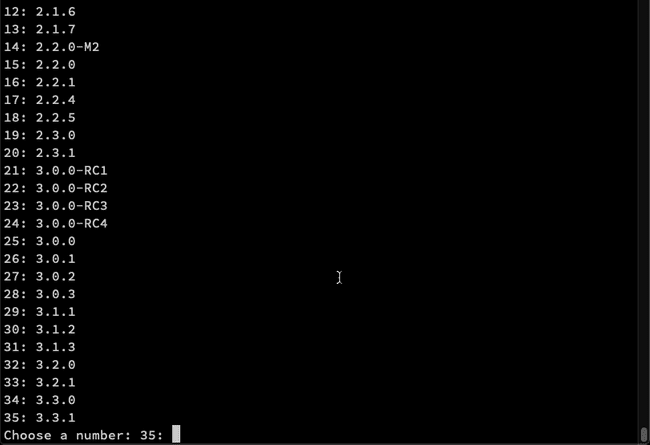
Simple type 1 to choose the Gatling archetype. On the next screen, choose the latest version:
I typed in 35 to choose version 3.3.1 for this tutorial.
For the groupId type in com.gatlingTest.
For the artifactId type in myGatlingTest.
For the version, simple press enter to accept 1.0-SNAPSHOT.
Finally for the package, press enter again to accept com.gatlingTest as the package name.
Last of all type in Y to confirm all settings, and Maven will create a new project for you.
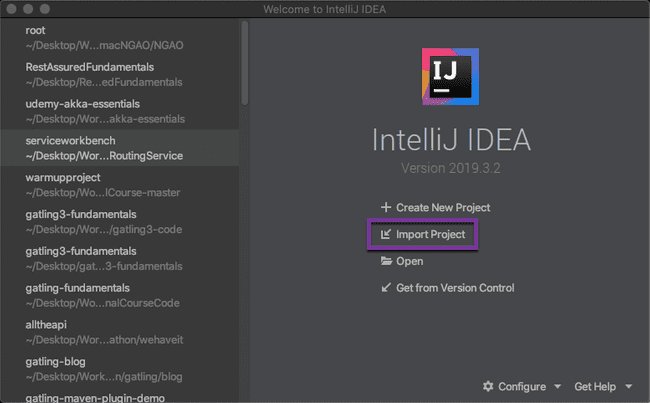
The next thing to do is import this project into your IDE. Here, I will import into IntelliJ.
From the IntelliJ welcome page, select Import Project.
Browse to the project folder that you just created, and select the pom.xml file. Click open, and Intellij will begin importing the project into the IDE for you.
Once the project is imported, open up the Project Directory pane on the left and expand the src > test > scala folder. Double click on the Engine.scala class. You might see a message No Scala SDK in module at the top of the screen. If so, click on Setup Scala SDK:
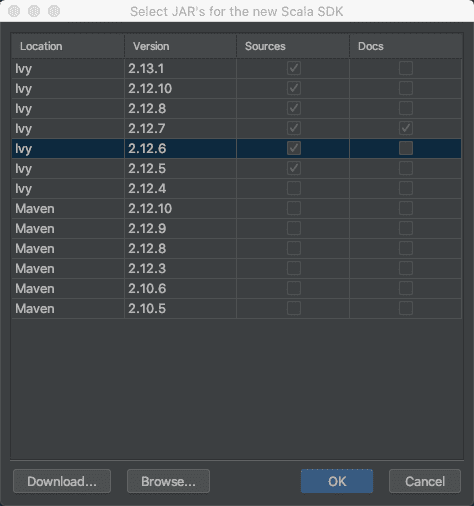
Check which versions of Scala you have available:
If you don’t have any version listed here, click on Create, choose a 2.12 version and click download:
NOTE: I HIGHLY recommend using version 2.12 of Scala with IntelliJ - 2.13 doesn’t seem to play nicely with Gatling
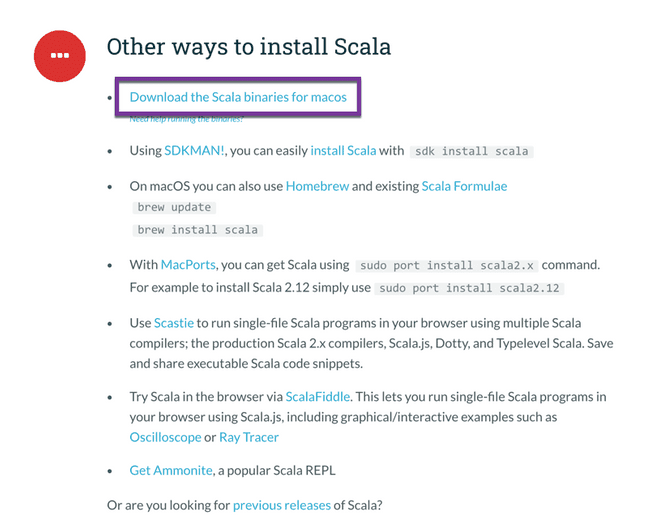
Alternatively, if you are having trouble downloading the Scala binaries through IntelliJ, you can instead download the Scala binaries directly from Scala-lang. Click on Download the Scala binaries as in this screenshot:
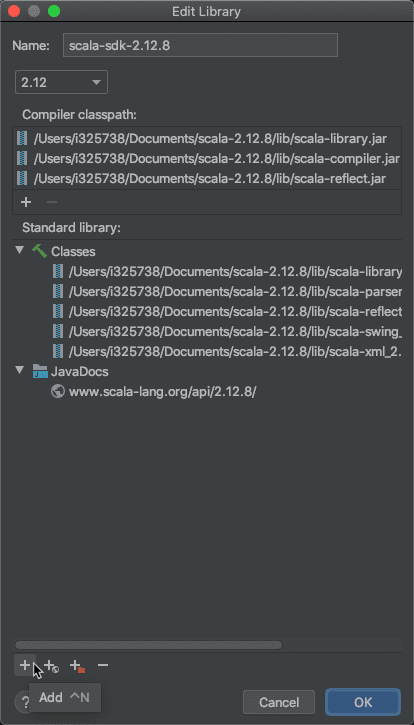
Save the binaries somewhere on your hard drive, and extract the ZIP file. Back in IntelliJ, click on Setup Scala SDK again, and this time click on Configure. Click the Add button in the bottom left corner:
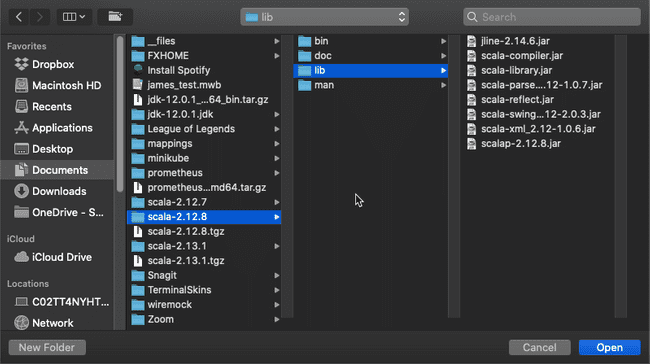
Browse to the folder that you just downloaded and extracted, and select the lib folder:
You should now be able to choose the Scala Library that you downloaded when on the Add Scala Support dialogue:
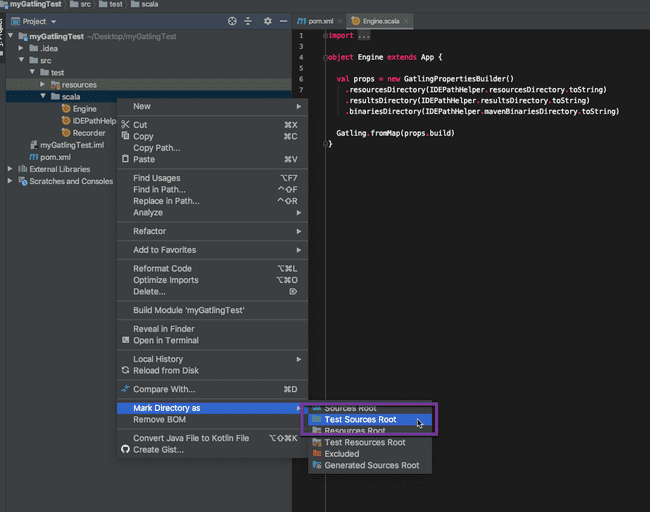
At this point, you might also need to mark the scala folder as source in IntelliJ. To do that, right-click on the scala folder and click Mark Directory As -> Test Sources Root:
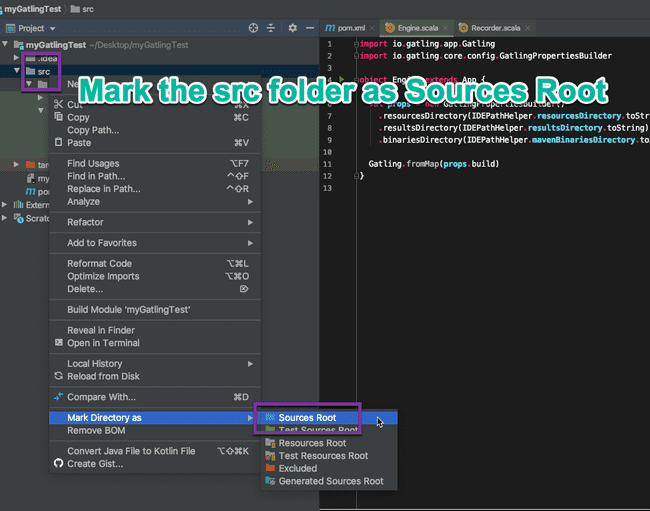
To be safe, also mark the main src folder as sources root as well:
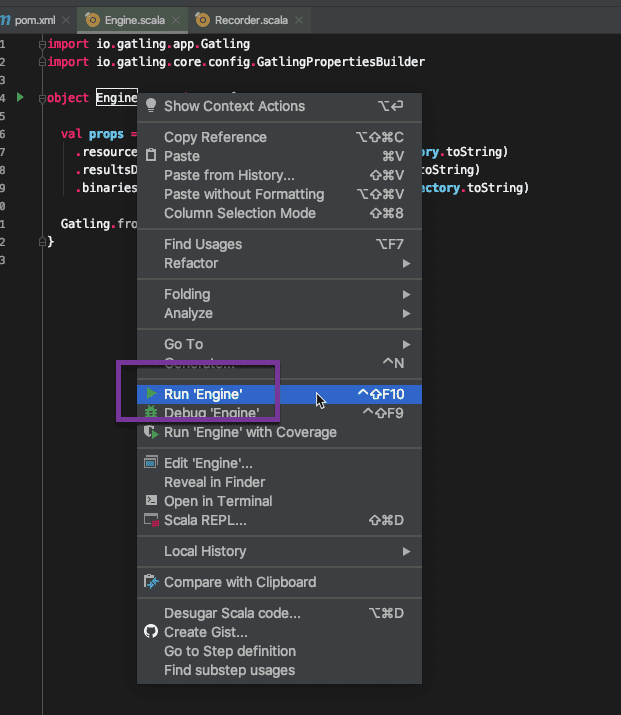
Finally, right-click on the Engine object and select Run:
You should see a message like There is no simulation script. Please check that your scripts are in user-files/simulations. This is fine, we will begin setting up our Gatling load tests scripts next.
3.4 Add a Sample Gatling Script
To test our new Gatling development environment, let’s add a basic Gatling script. This script will run a test against the Gatling Computer Database.
Note: In the rest of this post, we will write Gatling tests against a custom application that I have created to teach Gatling… I just wanted to show a simple script against the Gatling Computer Database here, so that we can check our environment is setup ok!
Right-click on the scala folder and select New > Scala Package - give the package a name of computerdatabase . Right click on this folder and select New > Scala Class - give the class a name of BasicSimulation. Go ahead and copy all the code below into the new class:
package computerdatabase

import io.gatling.core.Predef._
import io.gatling.http.Predef._
import scala.concurrent.duration._

class BasicSimulation extends Simulation {

  val httpProtocol = http
    .baseUrl("http://computer-database.gatling.io") // Here is the root for all relative URLs
    .acceptHeader(
      "text/html,application/xhtml+xml,application/xml;q=0.9,*/*;q=0.8"
    ) // Here are the common headers
    .acceptEncodingHeader("gzip, deflate")
    .acceptLanguageHeader("en-US,en;q=0.5")
    .userAgentHeader(
      "Mozilla/5.0 (Macintosh; Intel Mac OS X 10.8; rv:16.0) Gecko/20100101 Firefox/16.0"
    )

  val scn =
    scenario("Scenario Name") // A scenario is a chain of requests and pauses
      .exec(
        http("request_1")
          .get("/")
      )
      .pause(7) // Note that Gatling has recorder real time pauses

  setUp(scn.inject(atOnceUsers(1)).protocols(httpProtocol))
}
Now let’s run the script. Right-click on the Engine object and select Run Engine. Gatling will load, and you should see a message computerdatabase.BasicSimulation is the only simulation, executing it. Press enter, and the script will execute.
We can also run our Gatling test directly through Maven from the command line. To do that, open a terminal within your project directory and type mvn gatling:test. This will execute a Gatling test using the Gatling Maven plugin.
Our Gatling development environment is ready to go! Now we need an application to test against. We could use the Gatling Computer Database, but I have instead developed an API application specifically for teaching Gatling - The Video Game Database.
4. The Application Under Test - The Video Game DB
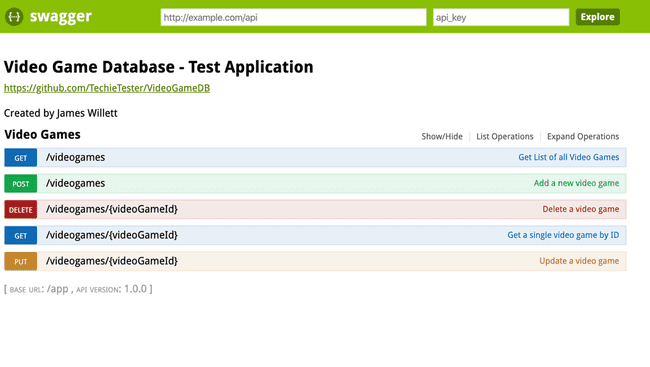
For the rest of this blog post, we will be writing tests against the Video Game Database. This application is a fictional database of videogames. It boasts a simple API documented with Swagger that features all the HTTP verbs (Get, Put, Update, Delete), and supports both XML and JSON payloads.
I would recommend cloning the Video Game Database and running it locally. To do that, first clone or download the repository and open a terminal at the location you saved it to on your machine. From there, you can start the application with either:
- Gradle -
./gradlew bootRun - Maven -
mvn spring-boot:run
After a few seconds, the application will load and you can browse to it at this address: http://localhost:8080/swagger-ui/index.html#/
You should see the Swagger homepage for the Video Game DB, which should look like this:
Feel free to play around with the API a bit through Swagger, trying out the various calls with XML and JSON.
Note: If you don’t want to (or can’t) download and run the application yourself locally, I also host a version of the Video Game Database on AWS. The reason that I suggest to run it locally, is that anyone with the AWS address can manipulate that data in the database, so you might see different data than what is shown in this blog post!
Now that we have access to the Video Game Database, we can start writing some Gatling scripts!
5. Fundamentals of Gatling Scripting
We are going to write a series of Gatling load testing scripts in the remainder of this tutorial post, to explore some of the core concepts of Gatling script development. Let’s start by creating a new package inside the scala folder of our project, to hold the Gatling scripts. Give the package a name of simulations.
5.1 Basic Makeup of a Gatling Script
Inside the package, create a new Scala class called MyFirstTest. Add the following code:
package simulations

import io.gatling.core.Predef._
import io.gatling.http.Predef._

class MyFirstTest extends Simulation {

  // 1 Http Conf
  val httpConf = http.baseUrl("http://localhost:8080/app/")
    .header("Accept", "application/json")
    .proxy(Proxy("localhost", 8888))


  // 2 Scenario Definition
  val scn = scenario("My First Test")
    .exec(http("Get All Games")
      .get("videogames"))

  // 3 Load Scenario
  setUp(
    scn.inject(atOnceUsers(1))
  ).protocols(httpConf)

}
This is pretty much the most basic Gatling script we can develop. It makes a single call to the endpoint at http://localhost:8080/app/videogames.
Let’s talk through each part of the script in turn:
5.1.1 Import statements
We added these two import statements at the top of the script:
import io.gatling.core.Predef._
import io.gatling.http.Predef._
These imports are where the Gatling packages get imported - they are both required for all Gatling scripts.
5.1.2 Extend Simulation
Next we extended our Scala class with the Gatling Simulation class:
class MyFirstTest extends Simulation {Again, we must always extend from the Simulation class of the Gatling package, to make a Gatling script.
On to the actual code inside the class, and it is divided into 3 distinct areas:
5.1.3 HTTP Configuration
The first thing that we do is setup the HTTP configuration for our Gatling script.
The HTTP configuration for our class looks like this:
// 1 Http Conf
val httpConf = http.baseUrl("http://localhost:8080/app/")
    .header("Accept", "application/json")
Here we are setting the baseUrl that will be used in all our subsequent API calls in the script.
We are also setting a default header of Accept -> application/json, which will also be sent in every call.
Other items can be set in the HTTP configuration - for the full list, check out the Gatling Documentation on HTTP configuration.
5.1.4 Scenario Definition
The Scenario Definition is where we define our user journey in our Gatling script. These are the steps that the user will take when interacting with our application, for example:
- Go to this page
- Wait 5 seconds
- Then go to this page
- Then POST some data through a form
- etc.
For our scenario definition in this script, we simply execute a single GET call to the videogames endpoint. Note that this calls the full endpoint of http://localhost:8080/app/videogames , as we defined the baseUrl in the HTTP configuration above:
// 2 Scenario Definition
val scn = scenario("My First Test")
		  .exec(http("Get All Games")
      		.get("videogames"))
5.1.5 - Load Scenario
The third and final part of the Gatling script is the Load Scenario. This is where we set the load profile (such as the number of virtual users, how long to run for etc.) for our Gatling test. Each of the virtual users will execute the scenario that we defined in part 2 above. Here, we are simply setting up a single user with a single iteration:
// 3 Load Scenario
setUp(
   scn.inject(atOnceUsers(1))
   ).protocols(httpConf)
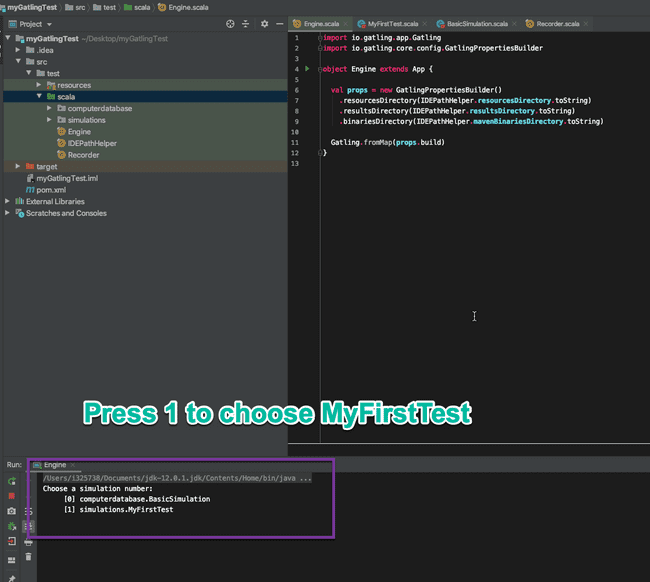
There we have it, a very basic Gatling script! We can run it by running the Engine class, and selecting the MyFirstTest script went prompted:
These 3 parts form the basic makeup of all Gatling scripts, i.e.:
- HTTP Configuration
- Scenario Definition
- Load Scenario
Let’s create more scripts to explore further Gatling functionality:
5.2 Pause Time and Check Response Codes
In this script, we introduce pause time between requests. We also are also checking the HTTP response code that we get back.
Go ahead and create a new Scala class in the simulations folder called CheckResponseCode. Add in the following code:
package simulations

import io.gatling.core.Predef._
import io.gatling.http.Predef._

import scala.concurrent.duration.DurationInt

class CheckResponseCode extends Simulation {

  val httpConf = http.baseUrl("http://localhost:8080/app/")
    .header("Accept", "application/json")

  val scn = scenario("Video Game DB - 3 calls")

    .exec(http("Get all video games - 1st call")
      .get("videogames")
      .check(status.is(200)))
    .pause(5)

    .exec(http("Get specific game")
      .get("videogames/1")
      .check(status.in(200 to 210)))
    .pause(1, 20)

    .exec(http("Get all Video games - 2nd call")
      .get("videogames")
      .check(status.not(404), status.not(500)))
    .pause(3000.milliseconds)

  setUp(
    scn.inject(atOnceUsers(1))
  ).protocols(httpConf)

}
5.2.1 Pause Times
In the above script, we make 3 API calls. One to videogames, one to videogames/1 and then another to videogames.
We introduced a different pause at the end of each call.
Firstly, on line 18 we typed .pause(5) - this will pause for 5 seconds.
Then we line 24 we did .pause(1, 20) - this will pause for a random time between 1 and 20 seconds.
Finally on line 29 we typed .pause(3000.milliseconds) - as you might expect, this paused the Gatling script for 3000 milliseconds. Note: for Gatling to recognize milliseconds, we need to import scala.concurrent.duration.DurationInt into our class
5.2.2 Check Response Codes
For each of our API calls, Gatling is checking the response code that codes back. If the response code does not match the assertion, Gatling will throw an error.
On line 17, we did .check(status.is(200))) - to check for a 200 response code.
Then on line 23 we checked .check(status.in(200 to 210))) - this will check that the response code is anywhere from 200 to 210.
Finally on line 28 we check that the response code was NOT something, with .check(status.not(404, status.not(500))) - to check that the status code is not a 404 or 500.
5.3 Correlation in Gatling with the Check API
The Check API in Gatling is used for 2 things:
- Asserting that the response contains some expected data
- Extracting data from that response
In this code example, we will use JSONPath to check for some text in the response body. We will then use JSONPath in another call, to extract some data from the response body and save that data into a variable. We will then use that variable in a subsequent API call in our Gatling script.
This process is called correlation, and is a common scenario dealth with in load and performance testing.
Go ahead and create a new script in the simulations folder called CheckResponseBodyAndExtract. Here is the code:
package simulations

import io.gatling.core.Predef._
import io.gatling.http.Predef._

class CheckResponseBodyAndExtract extends Simulation {

  val httpConf = http.baseUrl("http://localhost:8080/app/")
    .header("Accept", "application/json")

  val scn = scenario("Check JSON Path")

      // First call - check the name of the game
      .exec(http("Get specific game")
      .get("videogames/1")
      .check(jsonPath("$.name").is("Resident Evil 4")))

      // Second call - extract the ID of a game and save it to a variable called gameId
      .exec(http("Get all video games")
      .get("videogames")
      .check(jsonPath("$[1].id").saveAs("gameId")))

      // Third call - use the gameId variable saved from the above call
      .exec(http("Get specific game")
      .get("videogames/${gameId}")
      .check(jsonPath("$.name").is("Gran Turismo 3"))

  setUp(
    scn.inject(atOnceUsers(1))
  ).protocols(httpConf)

}
Here we are making 3 different API calls. In the first call, we are using JSONPath to check that the value of the name key in the JSON returned is Resident Evil 4 :
  .exec(http("Get specific game")
  .get("videogames/1")
  .check(jsonPath("$.name").is("Resident Evil 4")))
The above call was simply a check and assert on the game name. In the second call, we actually extract a value and save it into a variable. We are extracting the id of the second game returned in the JSON (i.e. the game at index 1):
  .exec(http("Get all video games")
  .get("videogames")
  .check(jsonPath("$[1].id").saveAs("gameId")))
Now that we have this gameId variable saved, we can go ahead and use that variable in the URL of the 3rd API call:
  .exec(http("Get specific game")
  .get("videogames/${gameId}")  .check(jsonPath("$.name").is("Gran Turismo 3"))
This is how to perform correlation in Gatling, by extracting with the .check() method, and then saving into a variable with .saveAs.
You can read more about the Check API in the Gatling Docs
5.4 Code Reuse in Gatling with Methods & Looping Calls
In the example scripts that we have seen so far, we are writing out all the code for each HTTP call individually. If we want to make another HTTP call to the same endpoint, it would be better to refactor this code into a method.
Doing this has the added benefit of making our scenario steps look clearer, as the logic behind each step is abstracted away.
Create a new script in the simulations folder called CodeReuseWithObjects. Here is the code:
package simulations

import io.gatling.core.Predef._
import io.gatling.http.Predef._

class CodeReuseWithObjects extends Simulation {

  val httpConf = http.baseUrl("http://localhost:8080/app/")
    .header("Accept", "application/json")


  def getAllVideoGames() = {
    repeat(3) {
      exec(http("Get all video games - 1st call")
        .get("videogames")
        .check(status.is(200)))
    }
  }

  def getSpecificVideoGame() = {
    repeat(5) {
      exec(http("Get specific game")
        .get("videogames/1")
        .check(status.in(200 to 210)))
    }
  }

  val scn = scenario("Code reuse")
      .exec(getAllVideoGames())
      .pause(5)
      .exec(getSpecificVideoGame())
      .pause(5)
      .exec(getAllVideoGames())

  setUp(
    scn.inject(atOnceUsers(1))
  ).protocols(httpConf)

}
We have defined two different methods, for the two different API calls that we make in the script. The first is for getAllVideoGames():
  def getAllVideoGames() = {
    repeat(3) {      exec(http("Get all video games - 1st call")
        .get("videogames")
        .check(status.is(200)))
    }
  }
Note that we added the repeat(3) method - this means that the code inside the block will repeat 3 times (i.e. it will make 3 HTTP calls).
The second HTTP call is to get a specific game:
  def getSpecificVideoGame() = {
    repeat(5) {      exec(http("Get specific game")
        .get("videogames/1")
        .check(status.in(200 to 210)))
    }
  }
Again, we added a repeat(5) method to loop this call 5 times.
We can now call these methods in our scenario, along with some pause time in between each method. This scenario now looks clearer:
  val scn = scenario("Code reuse")
      .exec(getAllVideoGames())
      .pause(5)
      .exec(getSpecificVideoGame())
      .pause(5)
      .exec(getAllVideoGames())
Following the above pattern is useful when your scripts grow to be more complex. This is particularly true if you often make the same or similar API calls throughout your Gatling script.
6. Gatling Feeders - for Test Data
Soon or later, you will need to start adding test data into your Gatling scripts. Since we are doing performance testing with Gatling, we will want to use different data for each virtual user. For example, you might want to login with different username/password combinations, or use different data in the same API calls.
Gatling has Feeders for this purpose. You can read about Gatling Feeders in the documentation.
Gatling offers a few different types of Feeders, namely:
- File based feeders (CSV, TSV, SSV, JSON)
- JDBC feeders
- Sitemap feeders
- Redis feeders
- Custom feeders
In this post we will first look at how to use a file based CSV feeder, before creating our own Custom feeders.
6.1 CSV Feeders
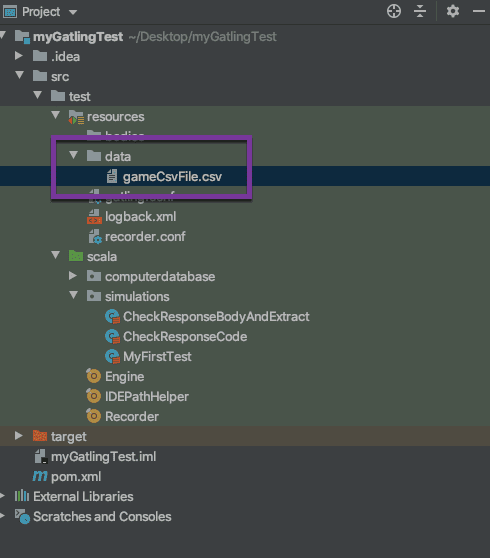
Starting with the CSV feeder, the first thing that we need is a CSV file to read from. In your Gatling project directory, create a folder called data inside the src > test > resources folder. Create a new file in that folder called gameCsvFile.csv:
Add the following text to the CSV file with some game data:
gameId,gameName
1,Resident Evil 4
2,Gran Turismo 3
3,Tetris
4,Super Mario 64
Now let’s make a new Gatling script to use this CSV file. Right click on your simulation folder and add a new Scala class called CsvFeeder. Add in the following code:
package simulations

import io.gatling.core.Predef._
import io.gatling.http.Predef._

class CsvFeeder extends Simulation {

  val httpConf = http.baseUrl("http://localhost:8080/app/")
    .header("Accept", "application/json")

  val csvFeeder = csv("data/gameCsvFile.csv").circular

  def getSpecificVideoGame() = {
    repeat(10) {
      feed(csvFeeder)
        .exec(http("Get specific video game")
        .get("videogames/${gameId}")
        .check(jsonPath("$.name").is("${gameName}"))
        .check(status.is(200)))
        .pause(1)
    }
  }

  val scn = scenario("Csv Feeder test")
      .exec(getSpecificVideoGame())


  setUp(
    scn.inject(atOnceUsers(1))
  ).protocols(httpConf)

}
At the top of the script, we are adding in the location of our CSV file:
val csvFeeder = csv("data/gameCsvFile.csv").circularNote that we are using the circular strategy for the file. Gatling offers 4 different strategies as follows:
.queue- default behavior: use an Iterator on the underlying sequence.random- randomly pick an entry in the sequence.shuffle- shuffle entries, then behave like queue.circular- go back to the top of the sequence once the end is reached
What this script is doing is making 10 calls to the videogames/${gameId} endpoint. For each call, we substitute in a different gameId taken from the CSV file. We also check that the game name matches the one we expect, again taking the gameName from the CSV file:
  def getSpecificVideoGame() = {
    repeat(10) {
      feed(csvFeeder)
        .exec(http("Get specific video game")
        .get("videogames/${gameId}")        .check(jsonPath("$.name").is("${gameName}"))        .check(status.is(200)))
        .pause(1)
    }
  }
We told the method to repeat 10 times, and provided the csv file with feed(csvFeeder).
Because we loop in a circular fashion, once we run out of entries in the CSV file, Gatling goes back to the top of the file and begins iterating through again.
6.2 Custom Feeders
Using CSV files (or other types of file) is great for test data, if you know exactly what all your test data permutations are upfront. But often, that is not the case.
Fortunately, Gatling offers a Custom feeder that will allow us to create test data directly in our code. These custom feeders require no data file, and instead are formed of pure Scala code.
In this example, we want to create new games in our database by sending HTTP Post requests to the API. Each of those requests must contain data for the game (game ID, game name etc.), in the form of either JSON or XML. We will use a custom feeder to create that data.
Create a new Scala class in the simulations folder, give it a name of CustomFeeder. Add in the following code:
package simulations

import java.time.LocalDate
import java.time.format.DateTimeFormatter

import io.gatling.core.Predef._
import io.gatling.http.Predef._

import scala.util.Random

class CustomFeeder extends Simulation {

  val httpConf = http.baseUrl("http://localhost:8080/app/")
    .header("Accept", "application/json")

  var idNumbers = (11 to 20).iterator
  val rnd = new Random()
  val now = LocalDate.now()
  val pattern = DateTimeFormatter.ofPattern("yyyy-MM-dd")

  def randomString(length: Int) = {
    rnd.alphanumeric.filter(_.isLetter).take(length).mkString
  }

  def getRandomDate(startDate: LocalDate, random: Random): String = {
    startDate.minusDays(random.nextInt(30)).format(pattern)
  }

  val customFeeder = Iterator.continually(Map(
    "gameId" -> idNumbers.next(),
    "name" -> ("Game-" + randomString(5)),
    "releaseDate" -> getRandomDate(now, rnd),
    "reviewScore" -> rnd.nextInt(100),
    "category" -> ("Category-" + randomString(6)),
    "rating" -> ("Rating-" + randomString(4))
  ))

  def postNewGame() = {
    repeat(5) {
      feed(customFeeder)
        .exec(http("Post New Game")
          .post("videogames/")
            .body(ElFileBody("bodies/NewGameTemplate.json")).asJson
          .check(status.is(200)))
        .pause(1)
    }
  }

  val scn = scenario("Post new games")
      .exec(postNewGame())

  setUp(
    scn.inject(atOnceUsers(1))
  ).protocols(httpConf)

}
The customFeeder is where the interesting code is. This is where we generate the values for all the parameters that we need for the test data:
val customFeeder = Iterator.continually(Map(
  "gameId" -> idNumbers.next(),
  "name" -> ("Game-" + randomString(5)),
  "releaseDate" -> getRandomDate(now, rnd),
  "reviewScore" -> rnd.nextInt(100),
  "category" -> ("Category-" + randomString(6)),
  "rating" -> ("Rating-" + randomString(4))
  ))
Whenever the customFeeder gets called in our script, it generates new values for the Map in this Iterator. The values come from the parameters and the methods that we defined above:
var idNumbers = (11 to 20).iterator
val rnd = new Random()
val now = LocalDate.now()
val pattern = DateTimeFormatter.ofPattern("yyyy-MM-dd")

def randomString(length: Int) = {
  rnd.alphanumeric.filter(_.isLetter).take(length).mkString
}

def getRandomDate(startDate: LocalDate, random: Random): String = {
  startDate.minusDays(random.nextInt(30)).format(pattern)
}
6.2.1 Using a template file for JSON
If we look inside the postNewGame() method, that makes the HTTP Post call, we can see that we are using an ElFileBody :
def postNewGame() = {
  repeat(5) {
    feed(customFeeder)
      .exec(http("Post New Game")
        .post("videogames/")
          .body(ElFileBody("bodies/NewGameTemplate.json")).asJson        .check(status.is(200)))
      .pause(1)
    }
  }
We need to create this template file. Inside the src > test > resources > bodies folder, create a new file called NewGameTemplate.json. Add in the following JSON:
{
  "id": ${gameId},
  "name": "${name}",
  "releaseDate": "${releaseDate}",
  "reviewScore": ${reviewScore},
  "category": "${category}",
  "rating": "${rating}"
}
Now, when Gatling use the HTTP post method, the parameters in this JSON File (e.g. ${gameId}, ${name}) etc. Get substituted for the values that were generated by the custom feeder. They are substituted, because the parameters have the same name.
7. Gatling Load Simulation Design
So far all of our Gatling scripts have just been running with a single user. This is fine for debugging and script development purposes, but eventually we will want to config our scripts to run with many users.
This is where load simulation design, or simulation setup comes in. If you want a quick overview, I have a video tutorial on Gatling load simulation design here.
Otherwise, I will explain with some examples below:
7.1 Basic Load Simulation
Let’s start with a basic load simulation. We will program the simulation to do the following:
- Upon executing the Gatling script, do nothing for 5 seconds initially
- Start up 5 users at the same time
- Start a further 10 users over a period of 10 seconds
The graph of active users during our simulation will look like this:
Go ahead and make a new Scala class in the simulations folder. Give it a name of LoadSimulationDesign. Add the following code:
package simulations

import io.gatling.core.Predef._
import io.gatling.http.Predef._
import scala.concurrent.duration._

class BasicLoadSimulation extends Simulation {

  val httpConf = http.baseUrl("http://localhost:8080/app/")
    .header("Accept", "application/json")

  def getAllVideoGames() = {
    exec(
      http("Get all video games")
        .get("videogames")
        .check(status.is(200))
    )
  }

  def getSpecificGame() = {
    exec(
      http("Get Specific Game")
        .get("videogames/2")
        .check(status.is(200))
    )
  }

  val scn = scenario("Basic Load Simulation")
    .exec(getAllVideoGames())
    .pause(5)
    .exec(getSpecificGame())
    .pause(5)
    .exec(getAllVideoGames())

  setUp(    scn.inject(      nothingFor(5 seconds),      atOnceUsers(5),      rampUsers(10) during (10 seconds)    ).protocols(httpConf)  )}
The only new code here is the simulation design, highlighted at the bottom.
7.2 Ramp Users Load Simulation
Let’s play with the scenario design a bit more, this time we will use the following:
constantUsersPerSec(rate) during(duration)- Injects users at a constant rate, defined in users per second, during a given duration. Users will be injected at regular intervals.rampUsersPerSec(rate1) to (rate2) during(duration)- Injects users from starting rate to target rate, defined in users per second, during a given duration. Users will be injected at regular intervals.
Change the setUp block of code at the bottom of the script to the following:
setUp(
  scn.inject(
    nothingFor(5 seconds),
    constantUsersPerSec(10) during (10 seconds),
    rampUsersPerSec(1) to (5) during (20 seconds)
  ).protocols(httpConf)
)
For visual purposes, the graph of active users will look something like this:
7.3 Fixed Duration Load Simulation
In the scenarios we have designed so far, all the users complete their designated iterations and then quit.
A different scenario design would be to run the load test for a fixed duration, and have the users loop continuously throughout the lifecyle of the test. Let’s look at an example of a Gatling script that can do that for us.
Firstly, we need to change our scenario() block to include a forever() block:
val scn = scenario("Fixed Duration Load Simulation")
  .forever() {
    exec(getAllVideoGames())
      .pause(5)
      .exec(getSpecificGame())
      .pause(5)
      .exec(getAllVideoGames())
  }
Now, change the setUp() block in the Gatling script to this:
setUp(
  scn.inject(
    nothingFor(5 seconds),
    atOnceUsers(10),
    rampUsers(50) during (30 second)
  ).protocols(httpConf)
).maxDuration(1 minute)
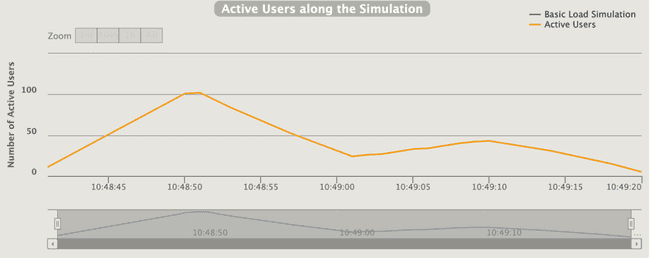
The key change that we had added here is the .maxDuration(1 minute). This is what this scenario looks like visually:
8 Running Gatling from the Command Line
At this point, we have a pretty good idea of how to create a Gatling script. So far, we have mostly been running our scripts through our IDE. Eventually, when we want to execute the scripts in production (for example, using a CI tool), we will want to execute from the command line.
When we created our Gatling project, we used Maven with the Gatling Maven Plugin. We can therefore use a Maven task to execute our Gatling test for us.
To execute a Gatling script through Maven, simply open a command prompt in the folder of your Gatling project and type:
mvn gatling:test -Dgatling.simulationClass=simulations.LoadSimulationDesignReplace simulations.LoadSimulationDesign with the name of the Gatling script that you want to execute.
8.1 Adding Assertions to our Gatling Scenario
Now that we are running our Gatling scenario as a Maven build, we can add Scenario Assertions. These will allow us to fail the build if a certain criteria is not met.
Add the following to the setUp block in your Gatling script:
setUp(
  scn.inject(
    nothingFor(5 seconds),
    atOnceUsers(10),
    rampUsers(50) during (30 second)
  ).protocols(httpConf)
).maxDuration(1 minute)
  .assertions(    global.responseTime.max.lt(100),    global.successfulRequests.percent.gt(95)  )
Here we are checking that:
- Maximum response time is less than 100 ms
- Number of successful requests is greater than 95%
If either of these assertions fail, then Gatling will fail the Maven build.
8.2 Specify Command Line Parameters for Gatling Scenarios
In all our Gatling scripts so far, we have hard-coded values such as the number of users.
When we come to run our Gatling scripts through CI, it will be useful to be able to specify values like the number of users or duration of the load test at runtime.
Let’s look at an example of how to do that.
Go ahead and create one more script inside the simulations folder called RuntimeParameters. Add the following code:
package simulations

import io.gatling.core.Predef._
import io.gatling.http.Predef._

import scala.concurrent.duration._

class RuntimeParameters extends Simulation {

  private def getProperty(propertyName: String, defaultValue: String) = {
    Option(System.getenv(propertyName))
      .orElse(Option(System.getProperty(propertyName)))
      .getOrElse(defaultValue)
  }

  def userCount: Int = getProperty("USERS", "5").toInt
  def rampDuration: Int = getProperty("RAMP_DURATION", "10").toInt
  def testDuration: Int = getProperty("DURATION", "60").toInt

  before {
    println(s"Running test with ${userCount} users")
    println(s"Ramping users over ${rampDuration} seconds")
    println(s"Total test duration: ${testDuration} seconds")
  }

  val httpConf = http.baseUrl("http://localhost:8080/app/")
    .header("Accept", "application/json")

  def getAllVideoGames() = {
    exec(
      http("Get all video games")
        .get("videogames")
        .check(status.is(200))
    )
  }

  val scn = scenario("Get all video games")
    .forever() {
      exec(getAllVideoGames())
    }

  setUp(
    scn.inject(
      nothingFor(5 seconds),
      rampUsers(userCount) during (rampDuration second)
    )
  ).protocols(httpConf)
    .maxDuration(testDuration seconds)
}
Let’s talk through how this script allows us to specify parameters at run time.
The first thing that we do, is define a method to extract the properties. This method will look for the environment variable of the specified name, and if it can’t find it will then look for the system property of the same name. If it can’t find that either, it will default to some value that we specify.
private def getProperty(propertyName: String, defaultValue: String) = {
  Option(System.getenv(propertyName))
    .orElse(Option(System.getProperty(propertyName)))
    .getOrElse(defaultValue)
}
Next, we define our variables. We give a default value for each one:
  def userCount: Int = getProperty("USERS", "5").toInt
  def rampDuration: Int = getProperty("RAMP_DURATION", "10").toInt
  def testDuration: Int = getProperty("DURATION", "60").toInt
For debug purposes, we print out these values to the console at runtime:
before {
  println(s"Running test with ${userCount} users")
  println(s"Ramping users over ${rampDuration} seconds")
  println(s"Total test duration: ${testDuration} seconds")
}
These values will then be fed into our setUp block. Note how we are using parameters like userCount and testDuration, instead of the hard-coded numbers:
setUp(
  scn.inject(
    nothingFor(5 seconds),
    rampUsers(userCount) during (rampDuration second)
  )
).protocols(httpConf)
  .maxDuration(testDuration seconds)
Let’s run a test from the command line to test this out. Open a terminal or prompt and type the following:
mvn gatling:test -Dgatling.simulationClass=simulations.RuntimeParameters -DUSERS=10 -DRAMP_DURATION=5 -DDURATION=30We are passing in the USERS, RAMP_DURATION and DURATION of the Gatling test at runtime through these parameters.
9. Gatling Results Analysis
At the end of each execution of a Gatling script, a Gatling Results Report is automatically created.
You will see a message in the console about where the report is located, i.e.:
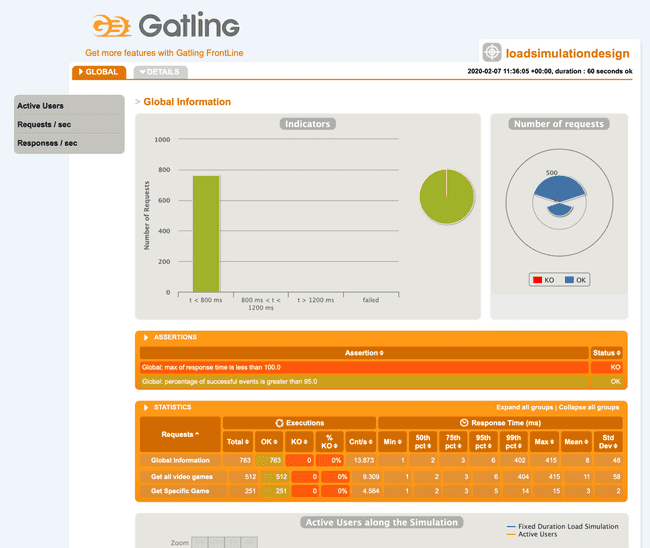
Please open the following file: /Users/jw/Desktop/myGatlingTest/target/gatling/runtimeparameters-20200207112322164/index.htmlThe report will look something like the one in the screenshot below. It contains lots of useful metrics on the response times of your requests, as well as details of errors that were encountered:
10. Summary & Next Steps
This blog post gave a thorough introduction to Gatling. If you made it through all the content in this post, you should be in a good position to begin writing your own Gatling tests against your application.
Of course, there is always more to learn. Here are some links to some other useful resources:
- Gatling Official Documentation - the official documentation and tutorials for Gatling
- Gatling Official Cheatsheet - useful cheatsheet containing every Gatling command
- Gatling Fundamentals Video Course - this is my Gatling course that I teach on Udemy
Some more advanced topics that will I am planning to cover in upcoming content include:
- Using Gatling with CI tools like Jenkins and Travis
- Graphical reporting of Gatling with Grafana
- Executing Gatling through Docker Containers
- Building a distributed Gatling load testing environment on multiple injectors
I hope you found this post useful! If you have any questions, please drop me a comment in the section below.
